Swagger Editor를 활용하여 Spring Boot 3와 Gradle 환경에서 OpenAPI Specification (OAS) YAML 파일을 작성하고 이를 기반으로 API를 구현하는 방법을 단계별로 설명하겠다. 이 과정은 Swagger Editor를 사용하여 YAML 파일을 작성하고, Spring Boot 프로젝트에서 이를 활용하는 방법을 포함한다.
1. Swagger Editor를 활용해서 openapi.yaml 파일생성하기
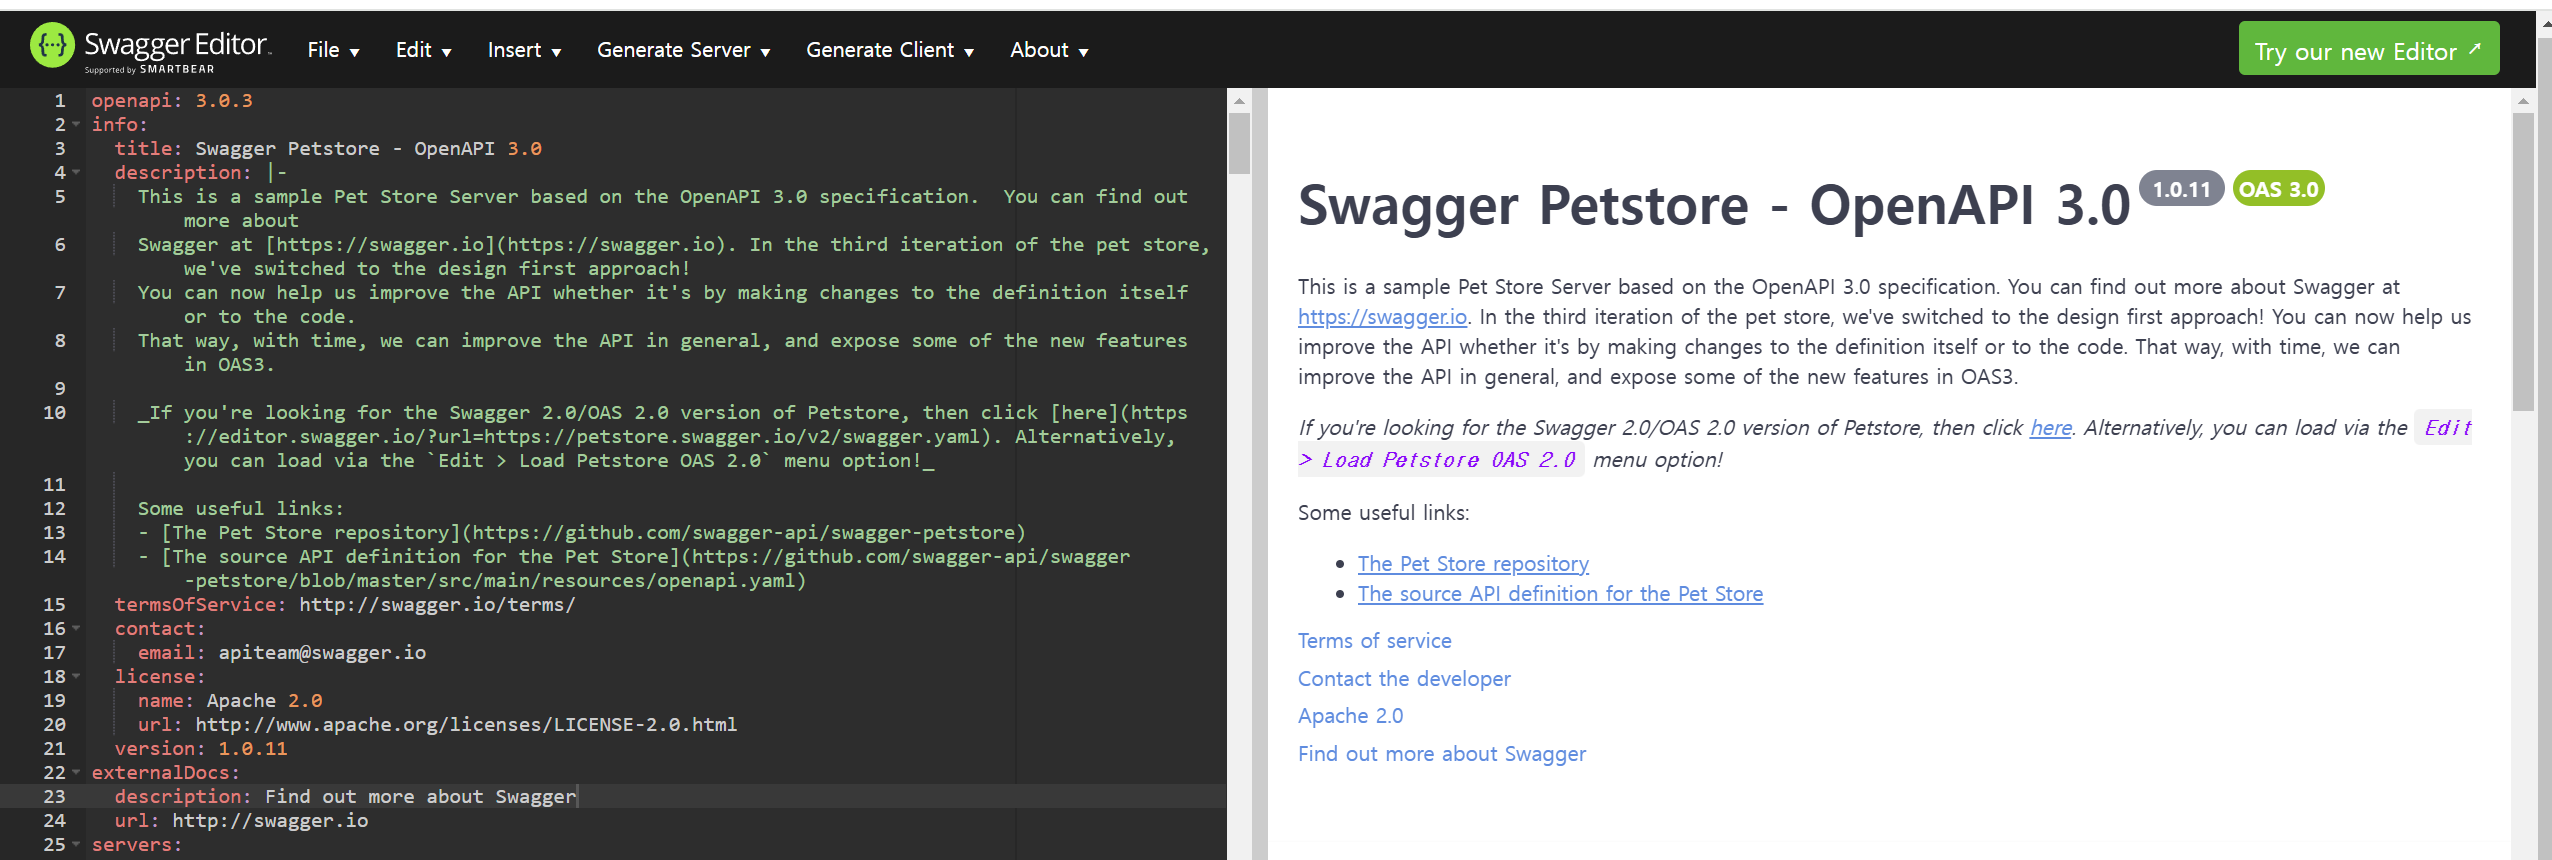
Swagger Editor( https://editor.swagger.io/ )에 접근하면 YAML 파일로 작성이 가능하고 즉시 문법확인과 예시를 확인할 수 있다.
2. Swagger Editor에서 YAML 파일 작성
- 기본 구조 설정
Swagger Editor를 열면 기본적으로 예제 YAML 파일이 로드된다. 이 예제를 참고하여 새로운 YAML 파일을 작성할 수 있다. 기본 구조는 다음과 같다.
openapi: 3.0.3
info:
  title: Swagger Petstore - OpenAPI 3.0
  description: |-
    This is a sample Pet Store Server based on the OpenAPI 3.0 specification.  You can find out more about
    Swagger at [https://swagger.io](https://swagger.io). In the third iteration of the pet store, we've switched to the design first approach!
    You can now help us improve the API whether it's by making changes to the definition itself or to the code.
    That way, with time, we can improve the API in general, and expose some of the new features in OAS3.

    _If you're looking for the Swagger 2.0/OAS 2.0 version of Petstore, then click [here](https://editor.swagger.io/?url=https://petstore.swagger.io/v2/swagger.yaml). Alternatively, you can load via the `Edit > Load Petstore OAS 2.0` menu option!_

    Some useful links:
    - [The Pet Store repository](https://github.com/swagger-api/swagger-petstore)
    - [The source API definition for the Pet Store](https://github.com/swagger-api/swagger-petstore/blob/master/src/main/resources/openapi.yaml)
  termsOfService: http://swagger.io/terms/
  contact:
    email: apiteam@swagger.io
  license:
    name: Apache 2.0
    url: http://www.apache.org/licenses/LICENSE-2.0.html
  version: 1.0.11
externalDocs:
  description: Find out more about Swagger
  url: http://swagger.io
servers:
  - url: https://petstore3.swagger.io/api/v3
tags:
  - name: pet
    description: Everything about your Pets
    externalDocs:
      description: Find out more
      url: http://swagger.io
  - name: store
    description: Access to Petstore orders
    externalDocs:
      description: Find out more about our store
      url: http://swagger.io
  - name: user
    description: Operations about user
openapi: OpenAPI 버전을 지정한다. OpenAPI는 시맨틱 버전 관리를 사용하므로 버전이 major:minor:patch 형식이 된다.
info: API에 대한 메타데이터가 포함된다. 이 정보는 문서 생성에 사용되며 클라이언트가 사용할 수 있다.
- title: API의 제목을 지정한다.
- description: API에 대한 설명을 제공한다. 마크다운 구문을 사용할 수 있다.
- termOfService: 서비스 약관으로 연결되는 URL이다.
- contact: API 제공자의 연락처 정보다.
- license: 라이선스 정보다. name 필드는 Apache 2.0 같은 라이선스 이름을 나타내는 필수 필드다.
- version: API의 버전을 지정한다.
externalDocs: externalDocs는 노출된 API의 확장 문서를 가리키는 필드다.
- description: 외부 문서의 요약을 정의한다. 마크다운 구문을 사용할 수 있다.
- url: 외부 문서에 대한 링크이다.
servers: API를 호스팅하는 서버 목록을 가진다. 이 부분이 제공되지 않으면 기본 값으로 호스트 된 문서 서버의 루트(/)를 가리킨다.
tags: API 엔드포인트를 논리적으로 그룹화하는 데 사용된다. 이를 통해 API 문서를 더 구조화되고 이해하기 쉽게 만들 수 있다. 해당 섹션은 선택 사항이지만, API 문서를 더 잘 조직화하는 데 도움이 된다.
- Paths 정의
paths:
  /hello:
    get:
      summary: Returns a greeting message
      operationId: getHello
      responses:
        '200':
          description: A greeting message
          content:
            application/json:
              schema:
                type: object
                properties:
                  message:
                    type: string
                    example: Hello, World!
/hello: 엔드포인트 경로를 지정한다.
get: HTTP 메서드를 지정한다. 여기서는 GET 요청을 정의한다.
summary: 엔드포인트의 간단한 설명을 제공한다.
operationId: 이 엔드포인트의 고유 식별자를 지정한다.
responses: 모든 API 오퍼레이션의 필수 필드다. API가 요청에 대해 응답할 수 있는 응답 타입을 정의한다. 이 속성에는 200과 같이 HTTP 상태 코드가 될 수 있는 응답이 하나 이상 필요하다.
description: 응답에 대한 설명을 제공한다.
content: 다양한 미디어 타입을 나타내는 콘텐츠 타입을 정의한다. (application/json, application/xml 등).
schema: 응답 데이터의 스키마를 정의한다.
type: 데이터 타입을 지정한다. 여기서는 객체(object)를 지정한다.
properties: 객체의 속성을 정의한다.
message: 속성 이름을 지정한다.
type: 속성의 데이터 타입을 지정한다. 여기서는 문자열(string)을 지정한다.
example: 예제 값을 제공한다.
- Components 정의
components:
  schemas:
    User:
      type: object
      properties:
        id:
          type: integer
        name:
          type: string
        email:
          type: string
          format: email
    Product:
      type: object
      properties:
        id:
          type: integer
        name:
          type: string
        price:
          type: number
          format: float
  responses:
    NotFound:
      description: Resource not found
      content:
        application/json:
          schema:
            $ref: '#/components/schemas/Error'
  parameters:
    UserId:
      name: userId
      in: path
      required: true
      schema:
        type: integer
  requestBodies:
    User:
      description: User object that needs to be added
      required: true
      content:
        application/json:
          schema:
            $ref: '#/components/schemas/User'
  securitySchemes:
    ApiKeyAuth:
      type: apiKey
      in: header
      name: X-API-KEY
components 절은 여러 재사용 가능한 객체를 정의할 수 있는 컨테이너이다. 주요 섹션은 다음과 같다
schemas: 재사용 가능한 데이터 구조를 정의한다.
responses: 재사용 가능한 응답을 정의한다.
parameters: 재사용 가능한 파라미터를 정의한다.
examples: 재사용 가능한 예제를 정의한다.
requestBodies: 재사용 가능한 요청 본문을 정의한다.
headers: 재사용 가능한 헤더를 정의한다.
securitySchemes: 재사용 가능한 보안 스키마를 정의한다.
links: 재사용 가능한 링크를 정의한다.
callbacks: 재사용 가능한 콜백을 정의한다.
추가적인 속성에 대한 자세한 설명은 https://swagger.io/docs/specification/v3_0/basic-structure/를 참고한다.
3. Spring Boot에 적용하기
2에서 작성한 yaml 파일은 src/main/resources/api 에 openapi.yaml 파일로 추가한다.
이후 build.gradle 파일에 해당 의존성을 추가한다. (예시는 현재 가장 최신인 Spring Boot 3.4.1 버전 기준)
swaggerCodegen 'org.openapitools:openapi-generator-cli:7.10.0'
compileOnly 'io.swagger:swagger-annotations:1.6.14'
compileOnly 'org.openapitools:jackson-databind-nullable:0.2.6'
implementation 'com.fasterxml.jackson.dataformat:jackson-dataformat-xml'
implementation 'io.springfox:springfox-oas:3.0.0'
implementation 'io.swagger.core.v3:swagger-annotations:2.2.27'
implementation 'org.springframework.boot:spring-boot-starter-hateoas'
implementation 'org.springframework.boot:spring-boot-starter-validation'
이후 방금 작성한 API 정의로부터 코드를 생성하기 위해 다음과 같은 작업이 필요하다.
1. plugins 부분에 org.hidetake.swagger.generator를 추가한다.
( https://github.com/int128/gradle-swagger-generator-plugin )
plugins {
	id 'java'
	id 'org.springframework.boot' version '3.4.1'
	id 'io.spring.dependency-management' version '1.1.7'
	id 'org.hidetake.swagger.generator' version '2.19.2'
}
2. OpenAPI Config 정의
OpenAPI Generator의 CLI가 사용해야 하는 모델과 API 패키지 이름이나, REST 인터페이스 또는 날짜/시간 관련 객체 생성 시에 사용하는 라이브러리 등 여러 설정이 필요하다. 이러한 모든 설정은 config.json(/src/main/resources/api/config.json)에 정의한다.
( https://openapi-generator.tech/docs/generators/spring/ )
{
  "library": "spring-boot",
  "dateLibrary": "java8",
  "hideGenerationTimestamp": true,
  "modelPackage": "com.kmhoon.app.model",
  "apiPackage": "com.kmhoon.app",
  "invokerPackage": "com.kmhoon.app",
  "serializableModel": true,
  "useTags": true,
  "useGzipFeature" : true,
  "hateoas": true,
  "unhandledException": true,
  "useSpringBoot3": true,
  "useSwaggerUI": true,
  "importMappings": {
    "ResourceSupport":"org.springframework.hateoas.RepresentationModel",
    "Link": "org.springframework.hateoas.Link"
  }
}
해당 설정은 spring-boot를 라이브러리로 설정하고, Swagger Codegen이 스프링 부트와 일치하는 클래스를 생성하도록 한다. useSpringBoot3 설정을 통해 생성된 클래스를 스프링 부트 3과 일치시키도록 한다.
modelPackage, apiPackage, invokerPackage 부분에 정의된 경로는 이후 Api 인터페이스가 어디에 생성될지 경로이다. 개발중인 패키지 경로에 맞추어 작성하도록 한다.
3. OpenAPI Generator ignore 파일 생성
.gitignore와 같이 생성에서 제외할 코드를 특정할 수도 있다. src/main/resources/api/.openapi-generator-ignore에 다음 코드 줄을 추가한다. 해당 항목을 추가하면 API 인터페이스와 모델만 생성한다.
**/*Controller.java
4. build.gradle 파일 설정 작업
- swaggerSources 태스크 정의
- compieJava 작업 의존성에 swaggerSources 추가
- processResources 태스크에 generateSwaggerCode 태스크를 의존성으로 추가한다.
- 생성된 코드를 Gradle SourceSets에 추가
swaggerSources {
	def typeMappings = 'URI=URI'
	def importMappings = 'URI=java.net.URI'
	shibaHolic {
		def apiYaml = "${rootDir}/src/main/resources/api/openapi.yaml"
		def configJson = "${rootDir}/src/main/resources/api/config.json"
		inputFile = file(apiYaml)
		def ignoreFile = file("${rootDir}/src/main/resources/api/.openapi-generator-ignore")
		code {
			language = 'spring'
			configFile = file(configJson)
			rawOptions = ['--ignore-file-override', ignoreFile, '--type-mappings',
						  typeMappings, '--import-mappings', importMappings] as List<String>
			components = [models: true, apis: true, supportingFiles: 'ApiUtil.java']
			dependsOn validation
		}
	}
}

compileJava.dependsOn swaggerSources.shibaHolic.code
sourceSets.main.java.srcDir "${swaggerSources.shibaHolic.code.outputDir}/src/main/java"
sourceSets.main.resources.srcDir "${swaggerSources.shibaHolic.code.outputDir}/src/main/resources"

processResources {
	dependsOn(generateSwaggerCode)
}
5. 빌드 실행
gradlew clean build 명령어를 수행해서 자바 인터페이스 코드를 생성한다.
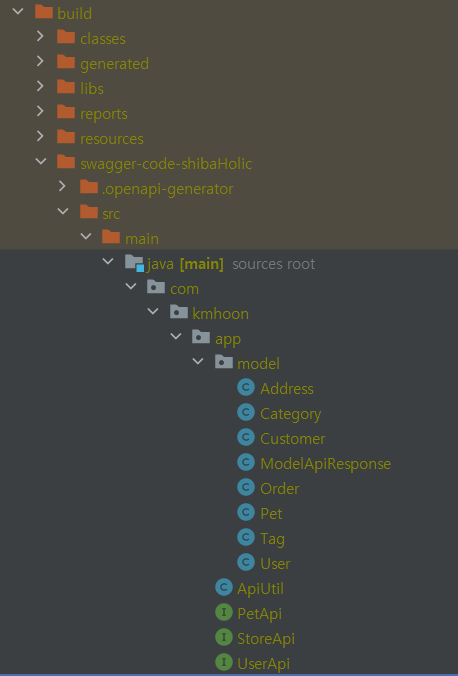
빌드가 정상적으로 성공하고 build/swagger-code-shibaHolic을 확인해보면, 이미지와 같이 Api 인터페이스와 Model이 생성되어 있는 것을 확인할 수 있다. Swagger에서 기본으로 제공하는 yaml을 적용하는 경우 이미지와 같이 나오게 된다.
6. 컨트롤러 오버라이딩 하기
이전에 ignore 처리를 했기 때문에, 컨트롤러를 직접 생성해서 구현해야 한다.
PetController를 생성해서 petApi를 상속하고 하기 이미지와 같이 Override Method 목록을 확인해보면 yaml 파일에 정의한 메서드 들을 모두 Override 할 수 있다는 것을 확인할 수 있다.
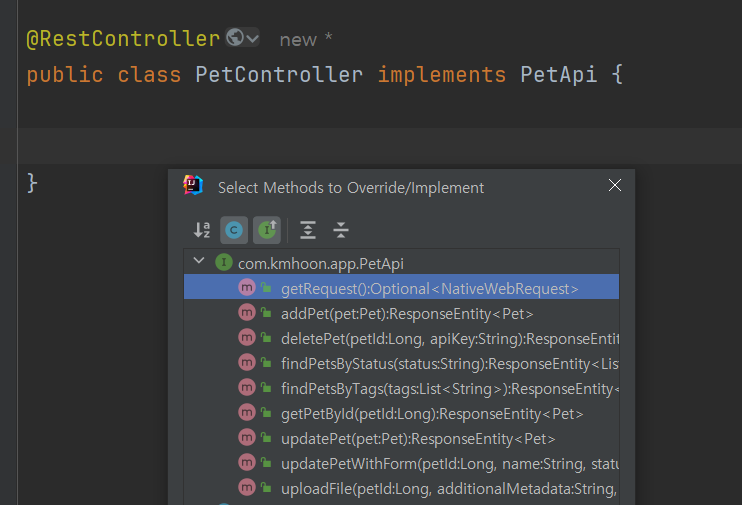
PetApi를 확인해보면, 하기 이미지와 같이 default로 구현되어 있는 것을 확인할 수 있다. 따라서, 반드시 구현하지 않는다고 오류가 발생하지는 않지만, 별도에 구현이 없이 호출하게 되면 501 상태를 받게 된다.
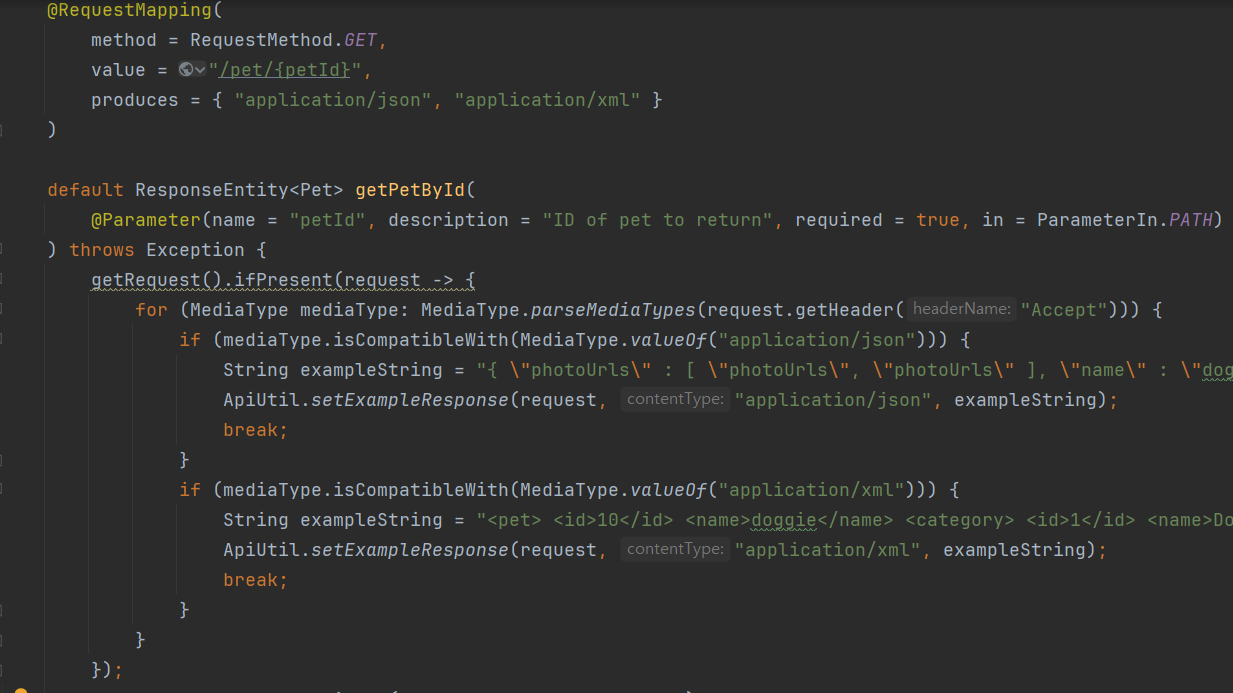
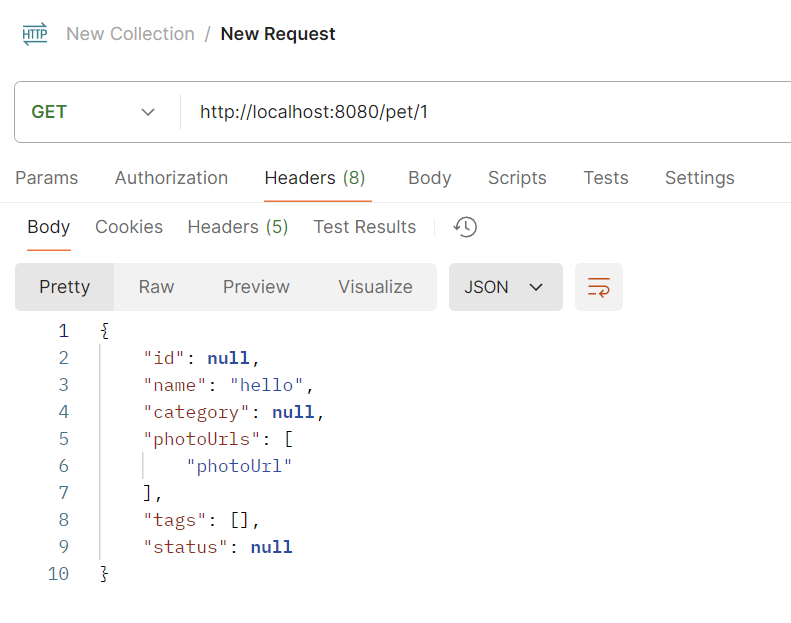
getPetById()를 구현해서 호출해 본다.

포스트맨으로 테스트하면, 다음과 같이 정상적으로 API가 호출되는 것을 확인할 수 있다.
'Spring' 카테고리의 다른 글
| [OAS] Swagger Codegen 필요성 (With. Spring Boot) (1) | 2024.12.26 |
|---|---|
| XSS 공격 방지를 위한 필수 도구 Jsoup clean 사용법과 예시 (0) | 2024.09.24 |
| 비동기 프로그래밍 @Async와 CompletableFuture (0) | 2024.08.29 |
| Controller에서 의존성 주입 대상 필드 값이 NULL이 되는 문제와 해결방안, 이유 (0) | 2024.02.17 |
| Spring Data Redis를 활용해서 레디스 기본 명령어 사용하는 방법 (0) | 2024.02.12 |


댓글